How to make a 100% attractive and professional online catalog
Making an online catalog for your products is an excellent way for your potential customers to learn more about your brand and decide to buy what they were looking for. In addition, you make known the full range of solutions that you have so that they can take it into account as a complementary purchase or when they want said product on a future occasion.
A virtual or online catalog can help you reach your target audience without having to move or open another branch. It's like a 24/7 salesperson who will help you increase your sales and position your brand.
For this reason, it is important to choose very well what you are going to include in it, present it in an organized way and with relevant information. This will help your sales close.
Therefore, now we will see the steps so that you can create your own online catalog.
Organize the content
Your catalog will need photos and text to be effective. But it should also be a user-friendly guide, where everything is easy to find.
In other words, it is not just about putting photos and relevant information on each item. It should also be visually appealing and neat.
Therefore, the first step is to think about what products you are going to place in your catalog. Make a detailed list of everything you have and you should classify by category.
Then, within each category you can organize either by subcategories, colors, size, design, style, etc.
Example:
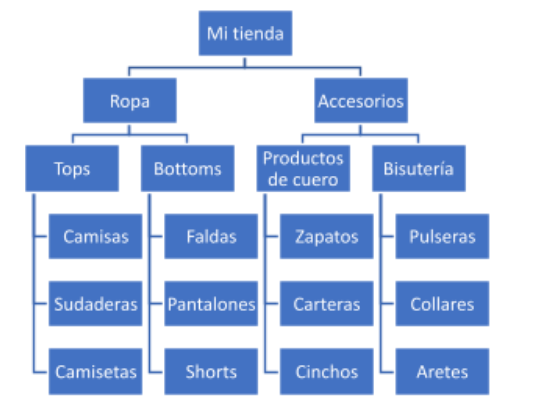
Imagine you have a clothing and accessories store. Among the clothes you have pants, skirts, shorts, t-shirts, sweatshirts, blouses. Among the accessories you have wallets, belts, shoes, bracelets, earrings and necklaces.
Naturally, clothing and accessories would be the two main categories.
But in the clothing category you decide to make a subcategory of tops , that is, garments for the upper part of the body. Here you place the t-shirts, sweatshirts and blouses. Then you make another one of bottoms or garments for the lower part and in it you include the pants, skirts and shorts.
Having these subcategories, if your store has diverse clothing styles, you can divide between casual, elegant, sports, etc. If all your clothes are of the same style, you can organize them by colors. Another option is to organize by brands, for example.
Once this is done you move on to the next category, which would be accessories. In it you make two subcategories that are leather products and jewelry. Within the leather products, you will have shoes, belts and wallets. In jewelry, bracelets, earrings and necklaces
To help you with this organization, you can make a small organizational chart or hierarchical map. You can use tools like LucidChart, MindMeister, or a Word or Canva template for easy editing and rearranging. You can even do it manually, either by drawing or taking sticky notes and placing the names of each thing on a table, so you can move and rearrange until you are satisfied with the result.
Once you have everything organized in this way, you will know very well what sections you are going to have and where each thing is going to go.
Important:
You do not need to make dozens of subcategories, since the idea is to facilitate the visit to the client. If your store only sells shoes, you can organize directly by styles or brands.
This same organizing technique can be used for any other product you sell: Music, personal care products, home décor, food, plants, safety gear, jewelry, etc.
In this way, when you put together your catalog it will be easier for the client to find what they are looking for than if you simply left everything “in bulk”, without organizing.
Photographs
Once the sections of your catalog have been planned, one of the crucial steps comes, product photography. Here you must show details of them, as well as their use if required.
The images of what you sell should be visually appealing.
Avoid dark photos or photos with shadows on objects, as well as blurred images, with poor resolution or where the quality of your product is not appreciated.
Therefore, unless you have photographic skills and have a good camera, it is best to hire a professional photographer . Think that photos are the first thing customers will see. It will be a small investment for something that will be of great benefit to you.
Details photos:
Whether you do it yourself or choose a professional, for detail images you should place each product on a neutral background.
Antitype:
If the product is light in color, it is best not to use a white or very light background, in case you need to remove the background from the image later.
Find a place with daylight, but where there is no direct sun. This could cause light reflections on some materials and cause details of the product to be hidden.
If you will be taking the photos, set the camera to the best resolution so you can work on them later. Images must be at least 300 dpi. If you hire a photographer, he will do the proper setup.
Each product should be photographed from different angles or showing details:
Returning to the example of clothing, you can show the front and back, close-ups of the quality of the seam, details of the print, etc. Take care that nothing reflects shadows on top of the photographed object.
Product usage photos:
This will depend on what you sell. If it's products like books or music, you may not need to show more than the details. But if it is a garment, a product for personal use, decoration, cleaning, etc., you can take photos of how it is used or how it looks on. Keep this in mind before you finish the task of photographing.
Antitype:
If you don't have a person who can help you pose for use images, you can use boards by placing the product next to matching items. If they are products from your own store, even better.
Here are a couple of examples from the web:
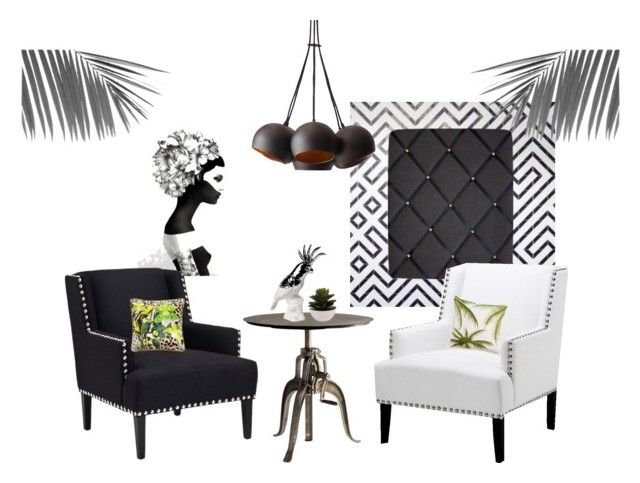

The idea is to show how what you sell can be combined with other things so that the customer can visualize himself using it.
When you finish detail and usage photos, you'll need to review the images, choose the best ones, and edit them to bring out the colors. You can seek help from an expert photo retouching designer for this.
Sort the images by folders according to the categories you created to make your later work easier.
Description of your products
Of course a good catalog is not only visually appealing, but also informative. It is important that you know all the specifications of each product to be added: Material, style, care, contraindications, brand, author (in the case of artistic works, for example), etc.
But, above all, you must describe the benefits for the client. It's a good idea to provide recommendations based on specific needs.
This could help the customer make the decision on what to buy from everything you offer.
If you sell a shirt, say that it is ideal for a certain occasion, that it can be combined with different clothes or colors, that it is ideal for sports, that it does not need ironing, that it fits perfectly to the figure. What makes that product worth it.
Write the name of the product, a brief description and then the benefits. After that, you can add more technical details, but these should not come before the benefits.
Example of how to write the information of your products:
Gray postman style bag.
Waterproof and super spacious, with many compartments so you can easily organize and find it. Fun and trendy print to wear to school or college.
Technical details:
Adjustable strap, double cell phone compartment, laptop compartment.
Material: Polyester
Dimensions: 50 x 40 x 7 cm
As you can see, the technical details are until the end, because the first thing that interests the client is how he will use the product. It is important that you write briefly and concisely how your product will serve them and why it is good.
After you have added this information you can place the price. If you have discounts in your store, put the original and discounted price. The conditions for discounts or promotions may go at the bottom of the catalog, using an asterisk to indicate it or next to the price
Another idea, if you have many products and need to inventory, is to assign a code to each product. This can be placed before the price:
Also #C-115
Price: US$40
Offer: USD $30 (until July 21, 2021)
Write each description in a single document where you can take each one when putting together the catalog. Review each photo folder and cross off the list of categories so you don't miss any product.
Also, your catalog will need you to add links to your contact site. This can be a form, a landing page, your website, your social networks, etc. Write down the links that you will place in each item or on each page.
If there is a minimum purchase amount to be specified or if there is a surcharge for home delivery, add the information below the price detail.
Graphic design
You have already organized the categories that your catalog will have, as well as the images and descriptions to use in each one. It's time to get down to work with the design. To place your catalog online, it is recommended to use the PDF format, since it allows you to organize by sections and pages, as well as a lot of creative freedom.
You can create a mock-up first, so you don't have to move and reposition everything for every change you make. This way you can calculate how your catalog will be distributed. It is an important step before placing images and texts.
measurements
You can choose letter size, which is 8.5 x 11 inches, or a square format, such as 10 x 10 inches, but it can be anything close to this. Take care that it is not too small so that the photos cannot be seen or too large so that you have to scroll to see each product.
The idea is that you place photos where the details can be well appreciated and also the large photo of the use of the product.
In this aspect, you can use an existing template on sites like Canva, and add the information or hire a designer. As a recommendation, look for an expert designer in the area of editorial design to help you, since these professionals know how pages are distributed in publications and can give you recommendations.
interior sections
Create an introductory page for each category you created. These will be the sections of your catalog. In them you can place a photo of product use if you wish or simply use a nice typography and design.
Another idea is to use the introductory page to put "educational text" about your product, depending on what you sell. The themes can be diverse: History of the brand, information on sustainability, the importance of skin care, how to choose the right garment, etc. Any topic that you consider relevant can be added briefly.
You can also add internal pages with more educational material, articles, returns and warranty information, etc. These pages will be interspersed within each section to give more value to the content of your catalog.
Colors
An important point is that if your store already has a brand identity , the colors of your catalog must be consistent with it. If you don't already have one, you can search online for some color palettes that reflect the spirit of your store.
You can use these colors for the background of your pages, for decorative elements within them, to create photo frames, etc. You can even use different colors for different sections.
Attention to this:
Even when each section has its introductory page or even if you decide to differentiate the sections with colors, you should not omit to place the name of the section in the headers or footers of your catalog.
You can put the name of the store next to the legend "Product Catalog" at the top and then the page number and name of the category or subcategory at the bottom. But this will depend on your personal taste, the important thing is that you do not omit the information.
Typography
As for the typeface, choose one that is easy to read. That the client does not have to try too hard or be distracted by details of the source. While you want your catalog to be attractive, you want the visual attention to be focused on the products, not the catalog itself.
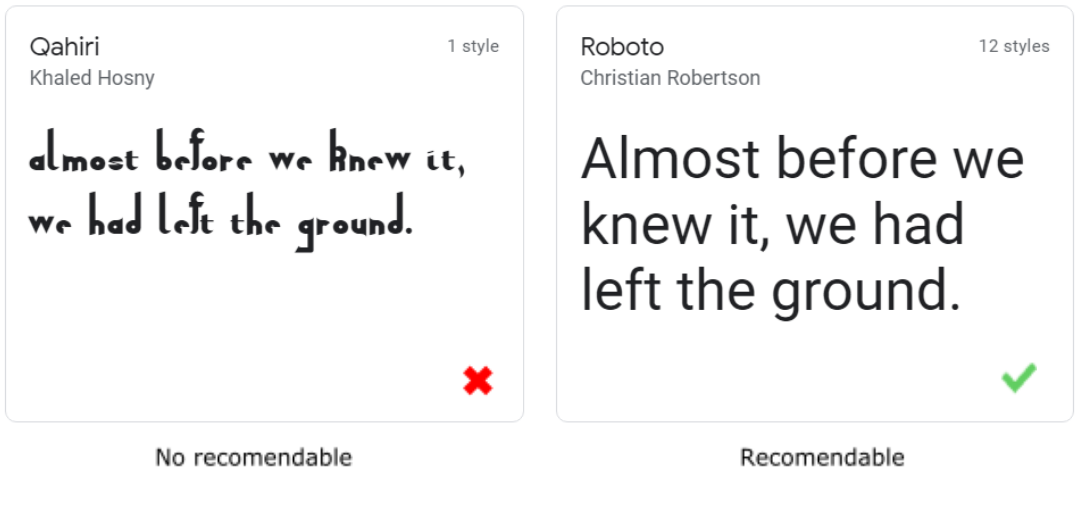
One tool that will help you choose and combine fonts is Google Fonts , where you will find thousands of ideas.
Front page
Your catalog design will not be complete without an excellent cover. It must contain the logo of your store and a design that the customer wants to click to enter to see more.
At this point it is highly recommended that you receive help or advice from a professional designer . Even if you have organized the rest of the content yourself. Using a template cover is not recommended. When the customer sees the cover of your catalog, it must be different from anything else they have seen and it must be really attractive. After all, it is the face of your store through said document.
Here you can choose more striking or larger designs and fonts, always taking care that it maintains consistency with the rest of the design. It is advisable to request 2 or 3 proposals to choose the one that is best.
At the end of your catalog you can also place a back cover where you put contact information, social networks, phone number or email, etc.
Close with a thank you and your logo.
Post your catalog online
Once you have chosen the cover, your catalog is ready to be exported to pdf and uploaded to the web. Try not to make it too heavy so that it can be easily lifted and carried.
If you have the help of a designer, ask them to export it to publish online. If you do it yourself, choose the lowest resolution setting when exporting. Open the catalog to verify that the document is displayed correctly.
This step is essential. You must verify that the photos and texts read well before uploading it to the web.
Once you make sure everything is correct, you can use a service like Issuu or Calameo to upload it online. These sites provide you with a link to share your catalog on your social networks or website. In addition, they give you the option to allow downloads of the catalog for those who want to save it or share the document directly.
A good idea is to convert the URL of your catalog into a QR code that you can put on your website, on your business cards, etc. So customers can scan it with their phone and open it immediately.
Clever! Your catalog is complete and ready to be seen by everyone.
As you can see, making an online catalog is a task that requires time. It needs to be carefully organized and its elements must be taken care of so that you get the results you are looking for. If you do it right, it will be one of your best sales allies.
Remember that you can always count on the help of professional freelancers for any stage of preparing your catalogue.
Get down to work and help your customers make better decisions about their purchases. Many successes!
Posting Komentar untuk "How to make a 100% attractive and professional online catalog"